Showing posts with label Riley Blake. Show all posts

Monday, September 16, 2013

Priscilla Patchwork Skirt Tutorial


I'm excited to have another tutorial is also appearing on Riley Blake's blog today, yay! This was fun to put together... hope you enjoy it!

I’m a big fan of long, flowy skirts and I love the look of patchwork, but don't have enough time these days to make entire quilts. This project is a great way to get that look without spending days or weeks cutting, pinning, sewing, basting, quilting and binding.

This skirt is sized to fit my older daughter who wears about a size 7-8. If you use fewer squares or fewer tiers, it can easily be adjusted for a smaller girl, or you could add squares and tiers to make a larger size, even for an adult. I had enough fabric left over to make a second skirt for my younger daughter, who wears a size 5. (Measurements for size 5 appear in parenthesis.)

It makes a rather full, almost-circle skirt that flies out rather well when the wearer spins around. If you'd like it to be not quite as full, just eliminate some of the squares, using the same ratio of squares (see *formula, below, to figure it out!)

To make it longer, you could either add a row at the top, or a row at the bottom. If you add a top row, use about 7 squares for it; if you add a bottom row, use 30 squares. Note: Adding a top row will make a skirt with less bulk at the top which may be more flattering for an adult.

The more variety of fabric coordinates you have, the more boho/gypsy it will look. For my version, I used a selection of fabrics from Lila Tueller's Priscilla collection, mostly in the blue colorway since my daughter's favorite color is blue. To me, the fabric’s design feels a little bit Victorian and the colors are very springy and feminine, which makes the skirt more sophisticated than boho, but different fabrics could completely change the feel of the finished garment.

There’s no pattern, because all that’s needed are 45 7”x7” squares — all you need is your fabric, a good ruler (I recommend a quilting ruler), cutting mat, and rotary cutter.

The skirt is easy to sew… it's just a lot of careful cutting, pinning, and straight seams. The hardest part is gathering each of the three the tiers and lining them up to sew together. Hey, if I can do it (despite the perpetual chaos that comes with three kids aged 6 and under, a puppy, a geriatric cat, two cockatiels, and a fish) anyone can!


Priscilla cottons


Fabrics Used — Lila Tueller Designs’ Priscilla


Supplies needed:
  • 2½ to 3 yards total of coordinating fabrics, about 1/8 quarter of each
  • rotary cutter
  • quilting ruler
  • 3/4" elastic, about 1" longer than the diameter of the wearer’s waist
  • The usual sewing paraphernalia: pins, thread, sewing machine, scissors


Instructions:

1. Measure & cut: Cut 45 (36) 7” squares from your fabrics. (NOTE: Included in that 7" size is a 1/4" seam allowance, so each tier will actually measure 6-1/2" high, making the finished skirt about 19" long. You may want to eliminate the bottom tier if making this for a very young child.)


Stacks of 7 inch squares ready to go

You’ll be sewing three tiers: the top tier is 10 (8) squares, the middle tier is 15 (12), and the bottom tier is 20 (16).

*Or use this formula to figure out how many squares you'll need if you're making it larger or smaller: amount of top tier squares; amount of top tier squares + 1/2 amount of top tier squares = middle tier; amount of top tier squares x 2 = bottom tier.

Lay out your squares on a table or floor in three rows to represent the three tiers, switching around fabrics until you’re happy with the layout. I tried to make sure that none of the same color or same patterned fabric ended up next to, above or below each other, which didn't work out quite as planned, not having taken into account the gathering that makes the lower tiers narrower. It still worked out okay! Of course, having lots of coordinates to choose from will give you more options.

2. Pink edges: (If you have a serger, you can skip this step.) Using pinking shears, trim the vertical edges of all the squares to prevent fraying. This also eliminates the need to zigzag stitch each seam after sewing, which I'd ordinarily do, since my kids, as most kids, are not particularly gentle on their clothes.

3. Pin & sew: Pin 10 (8) squares together for the top tier and sew, using a 1/4" seam allowance. Pin 15 (12) squares together for the middle tier and sew, using a 1/4" seam allowance. Pin 20 (16) squares together for the bottom tier and sew, using a 1/4" seam allowance. Serge the seams if desired (not necessary if you pinked the edges.)

4.  Gather tiers: Adjust sewing machine to longest stitch length, adjust your tension way up, and sew a straight stitch about 1/4" from the top edge of the middle and bottom tiers. Pull one thread to gather fabric until the top width of each tier matches the bottom of the tier it will be sewn to.

Pinning & sewing tiers together
5. Sew tiers together: Pin right sides of tiers together: top tier to middle tier, middle tier to bottom tier, adjusting the gather if necessary so the widths match up. Sew using a straight stitch. Zigzag stitch or serge along the edges you just sewed to prevent fraying — it’s more important to reinforce seams here, since there’s more stress on these seams than on the vertical ones in between the 7” squares. This can take significant fiddling to get them to match up properly... just be patient... it'll look great!

After sewing tiers together, it actually looks like something!

Note: I always put the gathered piece on top and the flat piece on the bottom when sewing; that way I can make sure the machine isn't pulling out the gather as I sew. I get so frustrated when I mess up and have to rip out all the seams and start over, which happens a lot! so I'm all for tips and tricks to prevent that!

That's what happens when you don't zigzag or serge the edges... lots of stray threads!

6. Sew side of skirt: Pin right sides of skirt together and sew, then zigzag or serge the edges to prevent fraying.

Note: It seems to be easier, for me at least, to sew the tiers together when they're flat. Some tutorials have you sew each tier together on the short side, making a tube, then gather and sew all the tiers to each other. I think having them flat makes it easier to measure and pin, so that's what I'm recommending here.

5. Create waistband: Fold over 1/8" of top edge, press. Fold sewn edge down again, creating a 1˝ channel, press and sew again, leaving about 1" open. Feed the elastic through the channel, putting a safety pin on one end of elastic to help it slide through more easily. Overlap ends of elastic, hand sew or machine sew together. Blind stitch the 1" opening closed.

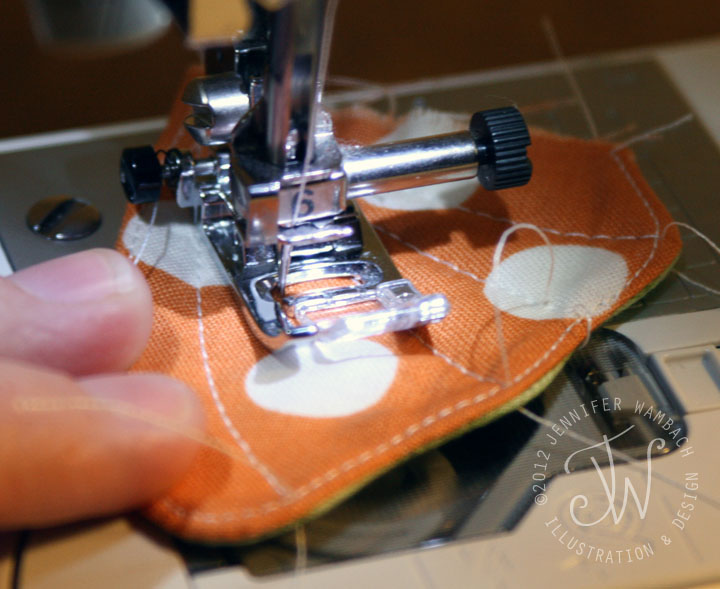
Hemming. 3/4 of the way through, my fancy machine broke a needle and kept giving me an 
error message... so out came my mom's old trusty Singer that can sew through fingers 
(really! it's gear driven)! That's why I didn't zigzag my edges.

6. Hem: Fold over 1/8˝ of bottom edge, press. Fold entire seam over again, press, and sew in place.

Topstiching tiers

7. Topstitch: Sew a straight stitch just above the seam where each of the tiers are sewn together. This is totally optional, but I think it gives the skirt a really nice finishing touch and makes it look more professional.

That’s it… Now your little one has something new to wear to school, or just for spinning around the livingroom! :)

Monday, December 10, 2012

Pinfeathers Pincushion Tutorial

I've finally gotten around to reproducing the tutorial on my own blog. It only took, um, almost a month... (yikes...) Someday I will miss these crazy, hectic, tiring days, right?!


PINFEATHERS
He's a pincushion, plus a keeper of needles and little notions that are easily misplaced... very handy to have next to your sewing machine!


I used Riley Blake's Flutter collection for my pincushion. I love the bright colors of these fabrics, and their combination of floral/nature motifs and handwritten words makes this owl-shaped pincushion a bit unexpected, I think.

Here's how to make one for yourself!


Materials:

- Fabric: about 1/8 yard each of 5 different fabrics (I used Riley Blake’s Flutter collection); scrap of orange felt; scrap of off-white felt; scrap of dark gray fabric

- fusible fleece or other heavyweight interfacing for wings

- lightweight interfacing for eyes, pocket, forehead

- fiberfill stuffing or ground walnut shells

- plastic pellets or rice to weight owl

- sewing machine, scissors, pinking shears, thread, pins, needle, printer

Step 1 - Cutting & Interfacing

1. Print pattern pieces, making sure page is set to print at 100% (in the print dialog box, choose “none” instead of “fit to printable area.”) Pin and cut pattern pieces, noting whether one or two are needed. Transfer markings to fabric: black triangles and black dots.

When cutting wing pieces (D), lay outside and inside fabrics RST, pin and cut. Then flip over wing pattern piece (D) when cutting opposite wing pieces.

Cut bottom eye pattern piece (F) with pinking shears to create a ruffled look.

Pinning wings, one side has fusible fleece ironed on

2. Iron lightweight interfacing to wrong side of forehead (A), eye-middle (G), eye-pupil (H), and outside piece of pocket (E). Iron fusible fleece to wrong side of outside piece of wings (see photo, above). On mine, I wanted the green fabric to be on the outside, so I ironed the fusible fleece to the two green wing pieces.

Figuring out where to place eyes, wings & beak


Step 2 - Owl Body

3. Match up top of forehead (A.) to top of body front (B.), pin and sew forehead to body, using a satin stitch along bottom, where indicated on pattern piece, from ear tip to tip. (I used a zig zag stitch, settings of 4.0 / 0.6. Anything closer together tended to pucker the fabric.)

4. Pin and sew beak to owl body front, covering up bottom of forehead. Refer to photo, above, for placement.

Sewing eyes to body


5. Stack eye pieces, largest to smallest (F, G, H), sew around each circle as shown in photo. Pin to owl on either side of beak, just under forehead and touching the top corners of beak (see photos for placement.) Sew just outside middle eye piece (G) to attach to body.

Pinning pocket, RST; pocket sewn to body, showing gap

6. Put two pockets pieces together, RST, sew around perimeter with 1/4” seam allowance, leaving about 1 inch open on bottom for turning (indicated by black dots on pattern.) Turn, pushing out corners with pointed but blunt object -- a knitting needle, or the wooden stick that comes in bags of fiberfill is ideal.

Top stitch only the top of pocket. Tuck edges of opening to inside, pin pocket to owl body, centering pocket in the middle and placing it about 1/4” below tip of beak. Pin, gapping top of pocket out slightly so it won’t become too tight once owl is stuffed (see photo). Sew to owl body just along edge of sides and bottom.
Topstitching wing (top); sewing "feather" lines (middle); finished wing (bottom)


Step 3 - Wings

7. Place wing pieces together, RST (fusible fleece will be on outside of one side), sew around edges, leaving flat side open. Turn, press, top stitch only around curved part of wings.

8. Sew lines for feathers. You can use the pattern as a template for placement, or just wing it (ha ha), as I did.


Wings pinned to body
Base pinned to bottom of body
Body all sewn up and turned right side out, showing opening for stuffing


Step 4 - The part that makes slogging through the not-so-fun sewing, seam ripping, and re-sewing all worth it!

9. Pin wings at sides of owl body front (flat, unsewn edge of wing will be even with outside edge of owl body — see photo, above), matching the edge of body with edge of wings. Place the top of wings slightly higher than top of pocket.

10. Pin front and back of owl body together, RST, sew with 1/4” seam allowance. Sew only around sides and top, leaving bottom open. Clip tips of ears.

11. Pin base to bottom of owl body, matching black triangles on pattern pieces. Make sure to insert feet in front where indicated by black triangle, facing the front of feet towards the inside. (See 2nd photo above, where the back of feet are peeking out.) Sew, leaving about 1 inch open for turning and stuffing, as indicated by black dots on pattern piece.

12. Turn, poke out ears, stuff with either fiberfill or crushed walnut shells. If using fiberfill, toss in a handful of plastic pellets at the bottom to weight it. Hand-sew opening shut.

Enjoy!

This little guy is really useful. He’s a pincushion, he holds needles inside his wings, and he keeps little things in his pocket that are essential to the operation of the sewing machine, things that also seem to be irresistible to a toddler (personal experience here!), like bobbins and seam rippers. He’s also kinda cute!

Why owls? I've always had a thing for them ever since growing up in the house next to the woods in a fairly rural area in New York State. We'd often hear Great Horned Owls at night back in the woods, calling to each other.

We actually had wildlife-a-plenty around that house: foxes, deer wandering through our back yard, possums in the shrubs, snakes, giant green bugs, pheasants, and in recent years there have even been a few black bears raiding residents' bird feeders. And we had our own "wildlife": a flock of chickens, a few ducks, two geese and two goats, and my little brother and me, of course. :)

I never did see an owl in real life, except in zoos and rehabilitation centers, until very recently. Although I now live in the suburbs of a large city, I've seen three Great Horned Owls sitting on neighbors' rooftops... pretty cool, I think!


Friday, November 16, 2012

Riley Blake pincushion tutorial


It's up on the Riley Blake Cutting Corners blog! Look for the downloadable PDF with pattern, photos and instructions (link is in bold, red type).

I hope you like it... and hope it makes sense, since much of the sewing, photo-taking and writing was done while fending off a very curious 2 year old, or at about 1 AM!

Friday, October 12, 2012

Blog neglect and hard drives in plastic baggies

I was driving home this morning after dropping off the eldest at school, thinking how the past six years somehow simultaneously feels like it's gone by in about an hour but also like it's taken an eternity.

It was an extraordinarily hot summer, and now that it's suddenly cool enough to kill off my sad little tomato plant with the one solitary tomato clinging to its branches, it feels like summer was only a week long. Yet while we were in the midst of it, it lasted about three hundred years.

Between breaking up kid fights, taking the knives away from the toddler or getting him down off the counter / table / chair / stairs / the geriatric cats, I've been neglecting a lot this year. Client work... getting really super serious about my fabric designs... vacuuming... keeping up with this blog... backing up my files.

A few weeks ago, my computer started making weird noises. One morning it just wouldn't turn on. Turns out the hard drive was dead. So dead even my in-house IT dept (my husband) couldn't get any data off it. Which means two years of stuff was gone, too, since I hadn't done a full backup since just before the youngest was born. Really big, giant oops.

Since then, I've been sitting around thinking of random stuff I want to use / read / look up / send to people, and then I remember it was all on the dead drive. Ugh. So much stuff.


The good news:

  • I just did my first Spoonflower design since HDD day and I have about a million more super exciting ideas in my head for new fabrics
  • I have an old computer with a new fancy giant hard drive
  • I'm almost over this cold
  • I get to draw dinosaurs
  • It's not 105 degrees outside
  • Nor is it snowing
  • I've discovered I'm an optimist
  • It's the season for Halloween / Dia de los Muertos and all the awesomely cool and creepy decorations that go with it
  • I get to design a pincushion and write up a tutorial for Riley Blake <-- (possibly the most exciting recent development of all)
So not all is lost (no pun intended.)