Saturday, February 2, 2013

The sketchbook, c. 2009


I used to do some freelance work for a Chicago creative agency, and for Christmas '08 they sent me a sketchbook. It was right after our second child was born, and after over three years of pregnancies, newborns and babies taking over my world, I resolved to get back to my roots -- fine art -- and fill up the sketchbook the following year.

Of course, stuff happened (baby #3, we tried to sell our house, husband got a new job, I got a new licensing deal), and the sketchbook remained 95% empty until recently.

When I got really obsessed with fabric designs, I started finding inspiration for prints all over the place. I needed a place to record them, and found that neglected sketchbook.

Sadly, it's not the only one. I have a big box of half- and quarter-filled sketchbooks, and even a stack of blank ones I bought for (why, again??) some long forgotten reason. Maybe it was before marriage and kids, when I had a regular paycheck and aspirations of wandering all over and recording it all in travel sketchbooks.

Some of my favorites: Canson and Arches make nice wide-format watercolor sketchbooks that are perfect for landscapes. (I have a couple of those... still blank... but I've used their paper in sketchbook form with mixed media (Canson), and for many-layered watercolors (Arches) and have been impressed with the quality.) Moleskine also has a watercolor one that's great for recording a really wide-angle view, since it's a flat bound book, not wire-bound. (I have one -- but it has only three quickie watercolors from 2010 in it.)

The good news is, that sketchbook from '08 is just seven pages from being full. Mostly on both sides of each page, too!

The bad news is, the sketches are really just that: quick, ugly, chicken-scratch-y. Mostly done with a half dried out Pigma Micron pen. A few magazine scraps glued on here and there. Nothing I'll ever win an award for. But all together, I like them. They're full of ideas, but not too precious, and there are a ton of them.

Now I have plans for the rest of those sketchbooks in that box in the basement.

_____________________

For anyone who loves pen, pencil, watercolor, a spiral bound blank book, and a couple hours of free time, here are a few of my favorite artists and sketchbooks for inspiration.


Monday, December 10, 2012

Pinfeathers Pincushion Tutorial

I've finally gotten around to reproducing the tutorial on my own blog. It only took, um, almost a month... (yikes...) Someday I will miss these crazy, hectic, tiring days, right?!


PINFEATHERS
He's a pincushion, plus a keeper of needles and little notions that are easily misplaced... very handy to have next to your sewing machine!


I used Riley Blake's Flutter collection for my pincushion. I love the bright colors of these fabrics, and their combination of floral/nature motifs and handwritten words makes this owl-shaped pincushion a bit unexpected, I think.

Here's how to make one for yourself!


Materials:

- Fabric: about 1/8 yard each of 5 different fabrics (I used Riley Blake’s Flutter collection); scrap of orange felt; scrap of off-white felt; scrap of dark gray fabric

- fusible fleece or other heavyweight interfacing for wings

- lightweight interfacing for eyes, pocket, forehead

- fiberfill stuffing or ground walnut shells

- plastic pellets or rice to weight owl

- sewing machine, scissors, pinking shears, thread, pins, needle, printer

Step 1 - Cutting & Interfacing

1. Print pattern pieces, making sure page is set to print at 100% (in the print dialog box, choose “none” instead of “fit to printable area.”) Pin and cut pattern pieces, noting whether one or two are needed. Transfer markings to fabric: black triangles and black dots.

When cutting wing pieces (D), lay outside and inside fabrics RST, pin and cut. Then flip over wing pattern piece (D) when cutting opposite wing pieces.

Cut bottom eye pattern piece (F) with pinking shears to create a ruffled look.

Pinning wings, one side has fusible fleece ironed on

2. Iron lightweight interfacing to wrong side of forehead (A), eye-middle (G), eye-pupil (H), and outside piece of pocket (E). Iron fusible fleece to wrong side of outside piece of wings (see photo, above). On mine, I wanted the green fabric to be on the outside, so I ironed the fusible fleece to the two green wing pieces.

Figuring out where to place eyes, wings & beak


Step 2 - Owl Body

3. Match up top of forehead (A.) to top of body front (B.), pin and sew forehead to body, using a satin stitch along bottom, where indicated on pattern piece, from ear tip to tip. (I used a zig zag stitch, settings of 4.0 / 0.6. Anything closer together tended to pucker the fabric.)

4. Pin and sew beak to owl body front, covering up bottom of forehead. Refer to photo, above, for placement.

Sewing eyes to body


5. Stack eye pieces, largest to smallest (F, G, H), sew around each circle as shown in photo. Pin to owl on either side of beak, just under forehead and touching the top corners of beak (see photos for placement.) Sew just outside middle eye piece (G) to attach to body.

Pinning pocket, RST; pocket sewn to body, showing gap

6. Put two pockets pieces together, RST, sew around perimeter with 1/4” seam allowance, leaving about 1 inch open on bottom for turning (indicated by black dots on pattern.) Turn, pushing out corners with pointed but blunt object -- a knitting needle, or the wooden stick that comes in bags of fiberfill is ideal.

Top stitch only the top of pocket. Tuck edges of opening to inside, pin pocket to owl body, centering pocket in the middle and placing it about 1/4” below tip of beak. Pin, gapping top of pocket out slightly so it won’t become too tight once owl is stuffed (see photo). Sew to owl body just along edge of sides and bottom.
Topstitching wing (top); sewing "feather" lines (middle); finished wing (bottom)


Step 3 - Wings

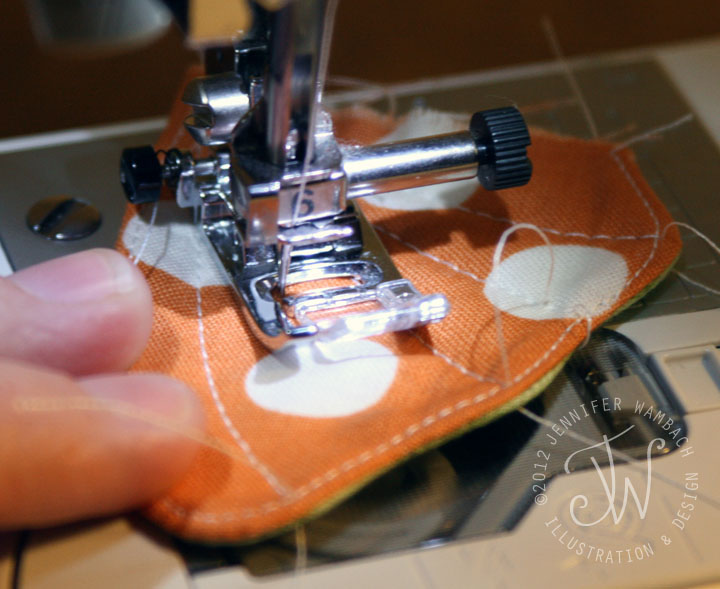
7. Place wing pieces together, RST (fusible fleece will be on outside of one side), sew around edges, leaving flat side open. Turn, press, top stitch only around curved part of wings.

8. Sew lines for feathers. You can use the pattern as a template for placement, or just wing it (ha ha), as I did.


Wings pinned to body
Base pinned to bottom of body
Body all sewn up and turned right side out, showing opening for stuffing


Step 4 - The part that makes slogging through the not-so-fun sewing, seam ripping, and re-sewing all worth it!

9. Pin wings at sides of owl body front (flat, unsewn edge of wing will be even with outside edge of owl body — see photo, above), matching the edge of body with edge of wings. Place the top of wings slightly higher than top of pocket.

10. Pin front and back of owl body together, RST, sew with 1/4” seam allowance. Sew only around sides and top, leaving bottom open. Clip tips of ears.

11. Pin base to bottom of owl body, matching black triangles on pattern pieces. Make sure to insert feet in front where indicated by black triangle, facing the front of feet towards the inside. (See 2nd photo above, where the back of feet are peeking out.) Sew, leaving about 1 inch open for turning and stuffing, as indicated by black dots on pattern piece.

12. Turn, poke out ears, stuff with either fiberfill or crushed walnut shells. If using fiberfill, toss in a handful of plastic pellets at the bottom to weight it. Hand-sew opening shut.

Enjoy!

This little guy is really useful. He’s a pincushion, he holds needles inside his wings, and he keeps little things in his pocket that are essential to the operation of the sewing machine, things that also seem to be irresistible to a toddler (personal experience here!), like bobbins and seam rippers. He’s also kinda cute!

Why owls? I've always had a thing for them ever since growing up in the house next to the woods in a fairly rural area in New York State. We'd often hear Great Horned Owls at night back in the woods, calling to each other.

We actually had wildlife-a-plenty around that house: foxes, deer wandering through our back yard, possums in the shrubs, snakes, giant green bugs, pheasants, and in recent years there have even been a few black bears raiding residents' bird feeders. And we had our own "wildlife": a flock of chickens, a few ducks, two geese and two goats, and my little brother and me, of course. :)

I never did see an owl in real life, except in zoos and rehabilitation centers, until very recently. Although I now live in the suburbs of a large city, I've seen three Great Horned Owls sitting on neighbors' rooftops... pretty cool, I think!


Sunday, November 18, 2012

Milo


We lost a member of the family on Friday. My cat that I've had for 16 years got very sick and I had to make that terrible decision.

I walked into the dining room this morning, half expecting to see him asleep on the chair in the sun. I always left the shades up and the chair sideways just for him, because he loved sleeping there so much.

I hope wherever he is now, there's an automatically refilling bowl of cat treats, a faucet that's perpetually turned on to just a trickle so he can get a drink whenever he wants, and a soft chair with a patch of sunlight always waiting for him.

I'm glad he's not suffering anymore, but man oh man, I miss him.

Friday, November 16, 2012

Riley Blake pincushion tutorial


It's up on the Riley Blake Cutting Corners blog! Look for the downloadable PDF with pattern, photos and instructions (link is in bold, red type).

I hope you like it... and hope it makes sense, since much of the sewing, photo-taking and writing was done while fending off a very curious 2 year old, or at about 1 AM!

Tuesday, November 13, 2012

Big news in my little corner of the world!


I'm so happy to announce my design, Hero-saurus, was chosen by Timeless Treasures as the winner of their Be My Hero contest on Spoonflower!!! Which is awesome in and of itself... but most awesome of all is they're going to license it! It's dorky, but it's pretty much a dream come true.


For sure I thought mine would NOT win... there were some really amazingly good designs, like this one by CJL Designs/Julie Lynch, which was probably my favorite. It's such a great illustration, and the layout, interesting repeat and unique color palette make it even better.

I just KNEW mine wouldn't win.

Last Thursday while the younger two were having breakfast, I saw the email from Spoonflower. I expected it to read, "Congrats, you're in the top 10, but unfortunately we didn't choose you design as the winner..." but it didn't. I just couldn't make sense of it. It took about four reads for it to register.

Then I think I yelled. My two year old jumped. (Luckily he was buckled into his high chair so he didn't fall out.) My four year old didn't understand what was wrong with Mommy.

I decided to be an artist when I was four years old, I think. At first, things looked fairly promising: At age eight, I won 2nd place in a nutrition placemat contest where the prize was breakfast with a bunch of senior citizens (not super fun for a 8 year old). In high school my artwork won a bunch of prizes, some local and a few Scholastic Awards.

I even got a BFA in visual art, in painting and drawing, specifically.

In the years after college, I meandered around the worlds of children's book illustration, fine art, crafts, graphic design, and illustration, never really finding my niche. I entered many art and design contests, but only won one: an American Graphic Design Award. What the heck was I going to be when I grew up??

Then I found Spoonflower. A couple months into my adventure in fabric design, I was shocked to win the Pointillism Fabric of the Week contest. Then came Alphabet, Hawaiian Quilt (a tie with this lovely one by Jessica Greenwalt), Bowling, Sewing, and now, Be My Hero. Craziness.

I feel awed having won six FOTW contests... and quite honestly, I feel very lucky to have found fabric design in the first place. It's a great mashup of a lot of the stuff I love to do: draw, paint, make repeats, create silly little characters, use my odd sense of humor, tell a story, use bright colors, ask my children's opinions on my work, create something really cool that's useful at the same time. I think it might be a perfect fit.

Saturday, October 27, 2012

Owlicious


Last Tuesday, as usual, I was waiting for #3 to wake up from his nap, while cooking dinner and working on some things on the computer. I was putting the finishing touches on an owl illustration, when all the sudden I was compelled to stop what I was doing and design a calendar for Spoonflower's Tea Towel calendar contest.


It was so weird. I had absolutely no intention of entering. But it was almost like the owl made me do it.

Good thing I did, I guess, because the calendar made it into the top 10, and my email notifications from Spoonflower sales (mostly of the owl calendar) have been going absolutely nuts! It's also a "hot seller" on Spoonflower's site... yay, me!

After a trying week of still not feeling well (three weeks of probably-bronchitis?), sick kids, angry clients, and exhaustion, it was really lovely to have something nice happen.

Now I'm thinking of designing a collection that includes the owl... but are owls a waning trend, like those "Keep Cool and Whatever" posters?

Friday, October 12, 2012

Blog neglect and hard drives in plastic baggies

I was driving home this morning after dropping off the eldest at school, thinking how the past six years somehow simultaneously feels like it's gone by in about an hour but also like it's taken an eternity.

It was an extraordinarily hot summer, and now that it's suddenly cool enough to kill off my sad little tomato plant with the one solitary tomato clinging to its branches, it feels like summer was only a week long. Yet while we were in the midst of it, it lasted about three hundred years.

Between breaking up kid fights, taking the knives away from the toddler or getting him down off the counter / table / chair / stairs / the geriatric cats, I've been neglecting a lot this year. Client work... getting really super serious about my fabric designs... vacuuming... keeping up with this blog... backing up my files.

A few weeks ago, my computer started making weird noises. One morning it just wouldn't turn on. Turns out the hard drive was dead. So dead even my in-house IT dept (my husband) couldn't get any data off it. Which means two years of stuff was gone, too, since I hadn't done a full backup since just before the youngest was born. Really big, giant oops.

Since then, I've been sitting around thinking of random stuff I want to use / read / look up / send to people, and then I remember it was all on the dead drive. Ugh. So much stuff.


The good news:

  • I just did my first Spoonflower design since HDD day and I have about a million more super exciting ideas in my head for new fabrics
  • I have an old computer with a new fancy giant hard drive
  • I'm almost over this cold
  • I get to draw dinosaurs
  • It's not 105 degrees outside
  • Nor is it snowing
  • I've discovered I'm an optimist
  • It's the season for Halloween / Dia de los Muertos and all the awesomely cool and creepy decorations that go with it
  • I get to design a pincushion and write up a tutorial for Riley Blake <-- (possibly the most exciting recent development of all)
So not all is lost (no pun intended.)